Rytr is one of the easier AI writers to learn. Here is the workflow I actually used.
Rytr does not make you start with a complicated dashboard or a long prompt. You can create a document, choose a writing use case, add a few details, select a tone, and generate.
After testing both the Free and Unlimited plans, I think this simple workflow is one of Rytr’s biggest strengths.
This tutorial shows the main steps I would teach a beginner first: sign in → create a document → choose a use case → add your input → generate → edit → use Chat or Brand Voice when you need more control.
Before you start: what Rytr is best at
Rytr is easiest to understand if you think of it as a simple writing assistant, not a complete content marketing system.
Short drafts
Social posts, product copy, emails, simple marketing text, and short sections.
Beginners
The interface has fewer moving parts than many larger AI writing platforms.
Quick AI help
You can also use AI inside a document you have already started writing.
Factual content
Always check claims, experience, statistics, SEO statements, and other facts before publishing.
Large content projects
Rytr does not feel like a large research or canvas-style content workspace.
Draft first, edit second
I treat Rytr output as material to work with, not as an automatic final version.
Step 1: Sign in to Rytr
The login page is simple and gives you several sign-in options.
You can start from Rytr’s login page and choose one of the available sign-in methods.
Step 2: Complete the short onboarding
Rytr asks what you mainly plan to write.
You may see options such as Personal, Work / Business, School / Academic, Creative / Fiction, or Other.
Choose the option that best matches how you expect to use Rytr. You do not need to overthink this step.
Step 3: Learn the main navigation
There are only a few main places you need to understand.
Organize your work
Create documents and folders and return to previous drafts.
Generate content
This is where you choose a writing use case, tone, and input.
Ask normal questions
Useful when you want a conversation instead of a fixed writing template.
Find old generations
Return to earlier prompts, settings, and outputs.
Step 4: Create a new document
This gives you a clean place for the next writing task.
Click New Document when you start a new task.
For unrelated tasks, I recommend creating a fresh document. It keeps your workspace much cleaner.
Step 5: Choose a writing use case
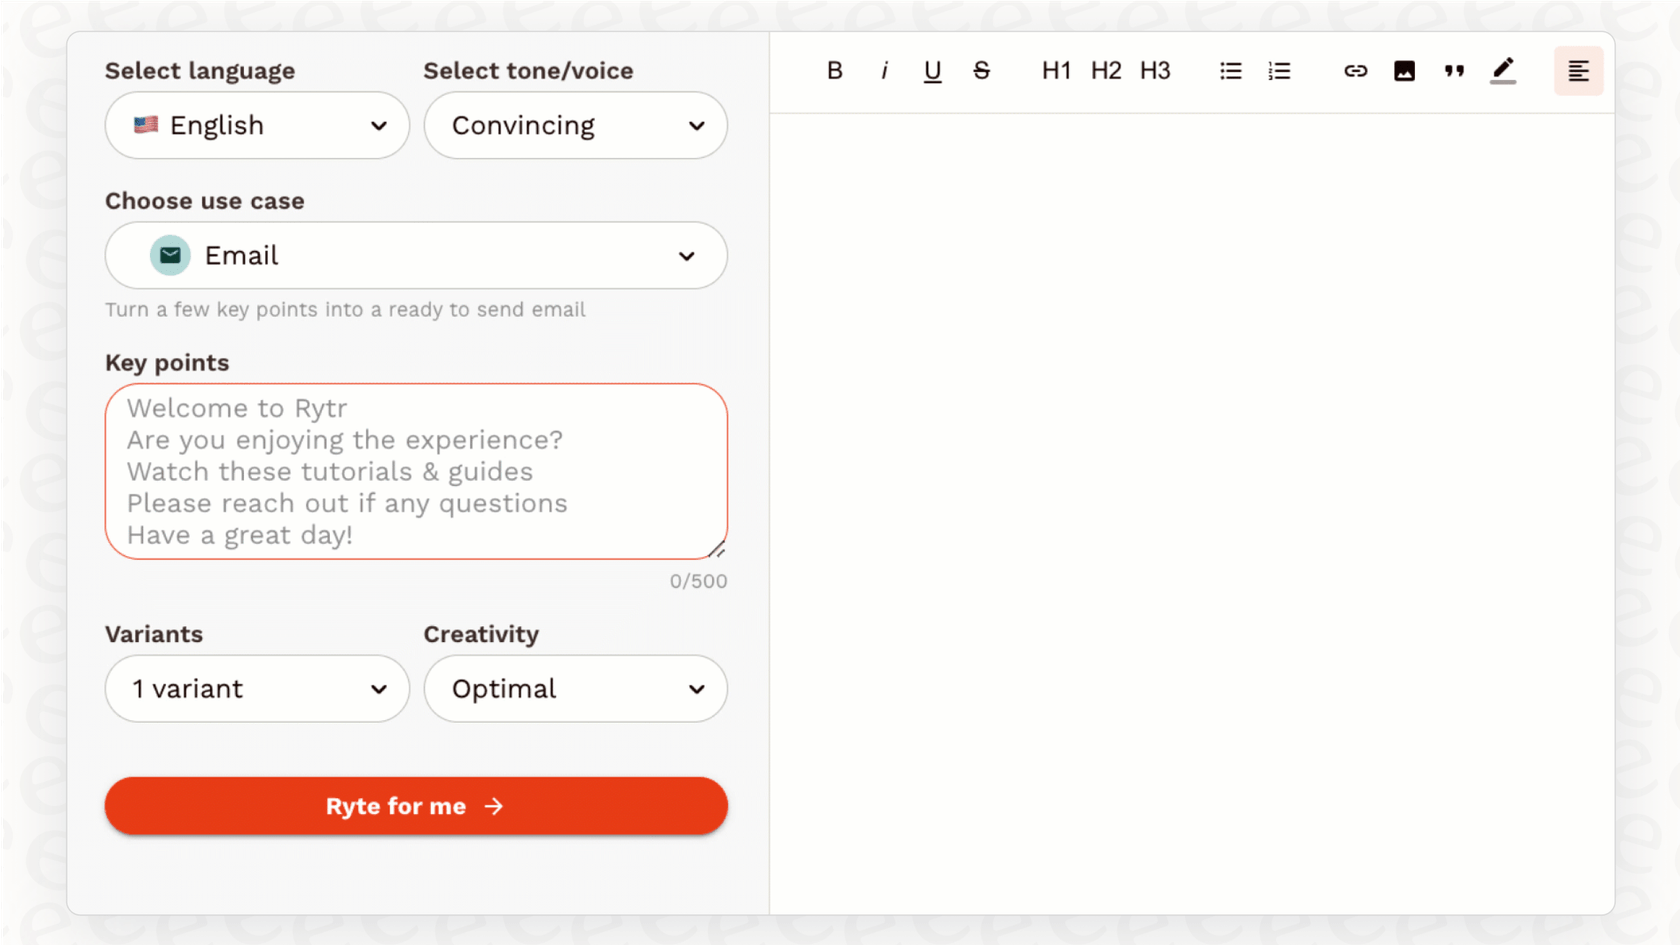
This is the main difference between Rytr Write and a normal chatbot.
The fields change depending on the use case.
For example:
| Use case | Good for | What I would enter |
|---|---|---|
| Facebook Post | Quick promotional or educational social content | Post type + key message |
| LinkedIn Post | Professional tips and business content | Objective + key message + target audience |
| Cover Letter | Starting a job application letter | Job role + skills |
| Poem Generator | Creative writing | A clear scene or poem idea |
| Magic Command | More flexible custom instructions | A normal detailed prompt |
Step 6: Add your input and choose the tone
More specific information usually gives Rytr a better starting point.
For my Facebook Post test, I used a real small-business style example.
Promote a new handmade soy candle
Key messageIntroduce a handmade lavender soy candle for people who want a calm and cozy home. It is made with natural soy wax, has a relaxing lavender scent, and comes in a reusable glass jar. Encourage people to visit the shop.
I then chose Convincing as the tone.
Step 7: Try a different tone before rewriting the prompt
The tone setting can change the result more than you may expect.
I kept the same candle task but changed the tone to Funny.
The result included much more playful language and jokes.
For more detail, see my Rytr AI Writer Review, where I compare several real writing outputs.
Step 8: Use Magic Command when a template feels too limited
This became one of my favorite writing options.
Magic Command gives you a more open prompt box.
Write a short comparison of AI writing tools for a beginner. Explain three things they should compare: ease of use, control over the output, and price. Use a friendly and practical tone. Do not claim that one tool is the best. Include a short introduction, three bullet points, and a two-sentence conclusion.
Use Magic Command when you want more control over structure, length, audience, or formatting than a normal use-case form gives you.
Step 9: Use Chat when you want a conversation
Chat is useful when the task changes while you think.
Instead of selecting a writing template, open Chat and describe the problem normally.
For my real test, I asked:
I run a small Etsy shop selling handmade soy candles. Give me 5 practical ideas to increase sales without spending money on ads.
Then I asked:
Which two ideas would you try first and why?
See the complete conversation in my Rytr Chat Review.
Step 10: Use History when you lose an earlier result
You do not have to recreate every old prompt.
This became especially useful when I was testing several use cases.
Optional paid step: create a Brand Voice
You do not need Brand Voice to learn Rytr.
On the Free plan I could open MyVoice, but Rytr asked me to upgrade before creating my own voice.
After upgrading to Unlimited, I created an AI Content Tools voice.
The Style Description field was limited to 200 characters, but the other fields gave me more room to explain how I wanted the AI to write.
If you want to see whether it really affected my output, read my Rytr Brand Voice Review.
You can also use AI inside text you already wrote
This is one of the workflows I liked most.
I manually wrote a few paragraphs, left a gap, and asked Rytr to add only one explanation in that place.
The workflow worked well, but the new paragraph was longer and more generic than my own writing.
See the full experiment in my Rytr Editor Review.
Should a beginner start with Rytr Free or Unlimited?
I would start with Free.
It already gave me enough access to understand the editor, use cases, tone controls, Documents, History, and basic workflow.
If you are learning
Test the real workflow before deciding whether you want to pay.
If you use it regularly
Unlimited makes more sense when the Free generation allowance starts getting in your way.
If you need Brand Voice
This was one of the clear paid differences during my test.
For a detailed comparison, see Rytr Free vs Unlimited.
5 beginner mistakes I would avoid in Rytr
| Mistake | Why it causes problems | What to do instead |
|---|---|---|
| Giving very little context | Rytr has to fill in more gaps. | Give the product, audience, goal, important facts, and limits when the form allows it. |
| Using one document for everything | Older generations can stay in the same document and make it messy. | Create a new document for a different task. |
| Publishing the first output | Some content can sound generic or overly promotional. | Read, shorten, personalize, and add real examples. |
| Trusting professional claims | My Cover Letter test added experience I had never supplied. | Fact-check every career, business, SEO, or statistical claim. |
| Ignoring tone settings | The wrong tone can make a usable structure feel completely wrong for the brand. | Try a second tone before rewriting the whole prompt. |
New to Rytr? Follow this simple path
If you do not know what to click first, this is the order I would use.
Create one document
Do not start by creating folders, voices, and multiple workflows.
Choose Facebook or LinkedIn
Use a short task where you can easily judge whether the output is useful.
Try two tones
See how much the personality changes.
Try Magic Command
Move to custom instructions when the templates feel too basic.
Try Chat
Use it for a real question with at least one follow-up.
Only then test paid features
Upgrade when you know which limitation is actually affecting you.
Continue with my Rytr tests
Rytr tutorial FAQ
Is Rytr easy for beginners?
Yes. Ease of use was one of the strongest parts of my test. The main navigation and writing workflow are simple enough to understand without much setup.
What should I create first in Rytr?
I would start with a short Facebook Post or LinkedIn Post. They are easier to judge than a large article, and you can quickly test different tones.
Should I use a template or Magic Command?
Use a template when your task fits one of Rytr’s ready-made use cases. Use Magic Command when you want more control over structure, audience, formatting, or instructions.
Can I use Rytr like a chatbot?
Yes. Rytr has a separate Chat area. In my test it remembered earlier context across several follow-up messages.
Can Rytr edit text I already wrote?
Yes. I tested adding AI content inside my own draft. Rytr inserted the new paragraph in the correct place, although I still needed to shorten and edit it.
Should I start with Rytr Free?
Yes. That is my recommendation for beginners. Use Free to learn the workflow, then upgrade only when the usage allowance or a paid feature becomes important.
Can I publish Rytr output without editing?
I would not recommend it. My tests found generic phrases, overlong sections, overly confident claims, and an unsupported experience claim in a Cover Letter test.
My beginner workflow for Rytr
Rytr is easiest when you keep the workflow simple.
Create a clean document. Choose one use case. Give Rytr enough information. Test a tone. Generate. Then read the result instead of immediately publishing it.
If the templates feel restrictive, move to Magic Command. If you need to think through a problem, use Chat. If you already wrote most of the text yourself, bring AI into the document only where you need help.
That is the way Rytr made the most sense to me.
I would not begin by trying to automate an entire content process. Rytr’s biggest strength is that it is simple. Use that simplicity.
Affiliate disclosure: I may earn a commission if you purchase Rytr through my link, at no extra cost to you. The steps and screenshots in this tutorial come from my own Rytr testing.